Trailing whitespace, often referred to as trailing spaces, includes any unnecessary spaces or tabs at the end of lines or on blank lines within your code. Though seemingly innocuous, trailing whitespace can clutter your codebase, complicate version control diffs, and lead to potential issues in code execution or rendering, particularly in languages where whitespace is significant.
Remove trailing whitespace in VS Code:
Automating the removal of trailing whitespace saves time and ensures consistency across your projects.
Setting Up VS Code to Remove Trailing Whitespace Automatically on File Save
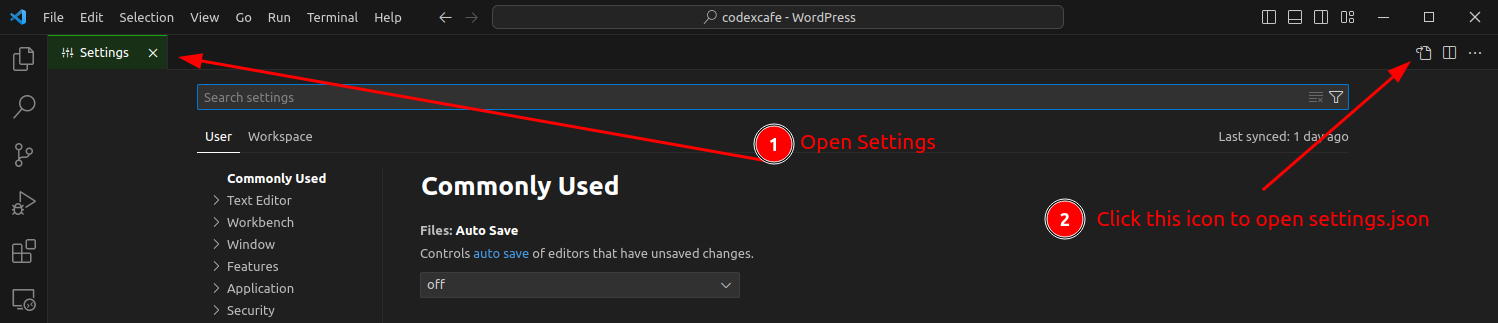
Step 1: Open Settings
Launch Visual Studio Code and access the settings menu. You can do this by clicking on File > Preferences > Settings. Alternatively, you can use the shortcut `Ctrl` + `,` on Windows/Linux or `Cmd` + `,` on macOS.
Step 2: Search for Trailing Whitespace Setting
In the settings search bar, type "trim trailing whitespace". This will filter the settings to show options related to whitespace management.
Step 3: Enable the Feature
You will see an option labeled Files: Trim Trailing Whitespace. By checking this box, you instruct VS Code to automatically remove any trailing whitespace at the end of lines whenever you save a file. Click the checkbox to enable this feature.

If you prefer to enable this feature only for certain programming languages, you can click on the file icon in the top right corner of the settings tab to open the settings.json file. Here, you can specify your preference using the [language] identifier, like so:
"files.trimTrailingWhitespace": false,
"[javascript]": {
  "files.trimTrailingWhitespace": true
}
This configuration will apply the automatic removal of trailing whitespace only to JavaScript files.
For project-specific settings, navigate to your project's root directory in VS Code, open the .vscode folder, and edit the settings.json file. If the folder or file doesn't exist, create them. Add the same setting as mentioned above:
{
  "files.trimTrailingWhitespace": true
}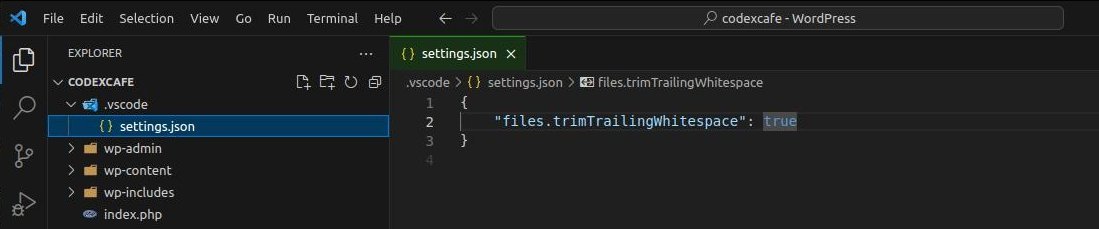
This ensures that trailing whitespace removal is applied only within the context of the current project, allowing for custom configurations across different projects.
- If you want to remove trailing whitespace manually without waiting for the file save action, you can use the Trim Trailing Whitespace command.
- Press `Ctrl` + `Shift` + `P` on Windows/Linux (or `Cmd` + `Shift` + `P` on macOS) to open the Command Palette.
- Type Trim Trailing Whitespace and press Enter. This command will remove trailing whitespace from the current file.

Conclusion
Removing trailing whitespace in VS Code is a straightforward yet effective way to enhance your coding practice. By following these simple steps, you can ensure your code remains clean and consistent, aligning with professional development standards. This not only improves the readability of your code but also facilitates a smoother collaboration process with others by avoiding unnecessary changes in version control systems.
As we wrap up this guide, we’re curious to hear from our fellow developers. How do you manage trailing whitespace in your projects? Do you configure VS Code to remove trailing spaces globally for all your work, or do you prefer setting it up on a project-by-project basis, tailoring the behavior to the specific needs and standards of each project?
We invite you to share your strategies and thoughts in the comments section below. Your insights could provide valuable perspectives for developers looking to optimize their coding environment and workflow. Whether you’re a seasoned developer or new to the field, understanding the community’s practices around something as fundamental as whitespace management can inspire improvements and innovations in your own development practices.
Leave a Comment